search here

You can visit our sponsor's for help

Stealthed CD-drive button

Stealthed CD-drive button reroute mod

Got a stealthed CD-drive but tired of pushing on your faceplate to pop it open? This mod will give you an external button that wont ruin your stealthed look.


Pictured above are the materials you'll need for this mod:
Some wire, I took it from a 92mm fan that died long ago
A momentary switch, available at your local RadioShack or electronics store
An optical drive

Not in the picture are the tools and other supplies you'll need:
- A soldering iron
- Solder
- Flux
*For those who don't know how to solder, I'll explain more in each step.

Above is a picture of the top of the PCB to the optical drive. Unfortunately on this drive the switch was not wired through the bottom, but was rather soldered onto the top. This means there weren't any exposed nodes on the bottom to solder the new switch to. Not a huge problem, but it makes the soldering a bit harder.

In the picture above I removed the switch, simply by tearing it off with a pair of pliers. This will give us a bit more room to solder the new switch on. You can see that the switch had 4 contact points, the 4 spots of solder that are circled on the PCB. The two closest to the edge are there simply to hold the switch in place and carry no electrical current. This means that the new wires will be soldered to the two interior nodes.

Above you can see the wires soldered on, (with professional efficiency of course). For soldering newbies: Plug in your soldering iron now. To solder the wires, open up your container of flux and use something like a clean nail to pick up a dab of it. Touch the flux to the nodes so that each node has a little bit of flux on it. Try not to have any flux touching the PCB, and definitely not any other electrical parts. Think of flux as a vacuum for solder, the flux will "suck" the solder towards it. If you're careful with your flux then your soldering will be cleaner. Strip the end of the wire (the less you strip the better, if you do it well enough you won't have to heat-shrink them) and place it on the node. After the soldering iron heats up, touch it to the solder, the solder will melt onto the iron. Now touch the iron (the part with solder on it) to your spot of flux on the PCB. This may take a little bit of practice so you may want to mess around with some spare wire, but the learning curve is quick.

Snake the wires through an existing hole in the cover of the optical drive, or if there isn't one you could drill your own.

Solder the wires onto the switch.

You can put the switch anywhere on your case, I chose the most convenient spot right on the front. A power drill with a quarter inch bit did the job just fine.

I also did this same mod on a second optical drive, on this one the switch DOES have nodes on the bottom of the PCB. Below you can see what it looks like soldered.

On this particular drive, the current carrying nodes for the switch are the two nearest the edge of the PCB. Obviously, drives do vary in their construction so you'll have to check to see which kind you have before you go soldering away.

And there you go! You've got an external button for your stealthed drive! Plug in your IDE and power molex and push the button to your hearts content!

Free N Full PC Software's

ADOBE PHOTOSHOP CS2+keygen

ADOBE PHOTOSHOP CS2+keygen
Adobe® Photoshop® CS2 software, the professional image-editing standard and leader of the Photoshop digital imaging line, delivers more of what you crave. Groundbreaking creative tools help you achieve extraordinary results. Unprecedented adaptability lets you custom-fit Photoshop to the way you work. And with more efficient editing, processing, and file handling, there's no slowing you down.

Keygen is in the ISO file. READ THE README IN IT ALSO!!

Download:
http://rapidshare.com/files/16064351/Adobe_Photoshop_CS2.part4.rar.html
http://rapidshare.com/files/16063397/Adobe_Photoshop_CS2.part3.rar.html
http://rapidshare.com/files/16062432/Adobe_Photoshop_CS2.part2.rar.html
http://rapidshare.com/files/16061613/Adobe_Photoshop_CS2.part1.rar.html

Password: whereisit.org

Adobe Photoshop CS3 Extended FINAL

Adobe Photoshop CS3 Extended FINAL
Homepage
CODE
http://www.adobe.com/products/photoshop/


How to install:
Extract The ISO.
Run setup.exe File.

DOWNLOAD:

http://rapidshare.com/files/29895879/Adobe.Photoshop.CS3.Extended.PROPER-SWAMP.First.part1.rar
http://rapidshare.com/files/29900590/Adobe.Photoshop.CS3.Extended.PROPER-SWAMP.First.part2.rar
http://rapidshare.com/files/29904735/Adobe.Photoshop.CS3.Extended.PROPER-SWAMP.First.part3.rar
http://rapidshare.com/files/29908738/Adobe.Photoshop.CS3.Extended.PROPER-SWAMP.First.part4.rar
http://rapidshare.com/files/29788208/Adobe.Photoshop.CS3.Extended.PROPER-SWAMP.First.part5.rar
http://rapidshare.com/files/29790077/Adobe.Photoshop.CS3.Extended.PROPER-SWAMP.First.part6.rar

Password: premium

Microsoft Windows Media Player 11.0.5721.5146

Microsoft Windows Media Player 11.0.5721.5146
Windows Media Player 11 is the all-in-one media player developed by Microsoft to provide users with the ability to view multimedia content, both from the Internet and from their hard drive. You can use Microsoft® Windows Media® Player 11 to play and organize digital media files on your computer and on the internet.
In addition, you can use the Player to play, rip, and burn CDs; play DVDs and VCDs; allows you to view MPEG and various other types of video content, as well as audio clips: synchronize your music, videos, and your favorite recorded TV shows to portable devices, such as portable digital audio players, Pocket PCs, and Portable Media Centers.

Download:
http://rapidshare.com/files/72481421/Media_Player_2011.0.5721.5146.rar

Password(for rar file):passiondownload.com

Kaspersky Internet Security 7.0 + Crack = Free

Kaspersky Internet Security 7.0 + Crack = Free
Download:
http://rapidshare.com/files/100513824/KIS_v_7.0.rar

Patch:
http://rapidshare.com/files/100731570/Patch__Kaspersky_AV-IS_7.0_.rar


Instructions to use Patch:

1. Install The Application KIS
2. Let Ur Pc Reboot
3. Then Disable Self Defence ( settings tab > services > uncheck the self defence check box)
4. Run The Patch ("Patch Name")
5. when The Patch Opens First Click "Key Remover"
6. then click "patch" KIS
7. Then Click "Clean"
8. Then Click "Key Kav + KIS 7" and extract dat in a folder (suppose d:/kiskey )
9. Then open KIS Or KAV and Click "Activation Tab" Then Click "enter key or watever"
10.Then Click "Already have license key " Then next ...
11.Then Browse To the place where u saved the keyd (d:/kiskey)
12.select the key and then enable self defence ...
13 enjoy the full version .. unlimited ..

Rapidshare Happy Hour Checker

Rapidshare Happy Hour Checker
From 17 April 2008, RapidShare open "Happy Hours" service. But sometimes the bandwidth is full, so "Happy Hours" can't active.
"RapidShare Happy Hour Checker" is a tool that check whenever RapidShare Happy Hours is enable for you, it's display information on taskbar ...

Download: http://rapidshare.com/files/113917361/Rapid.Share.Happy.Hour.Checker.rar

Spyware Doctor 5.5.0.212

Spyware Doctor 5.5.0.212
http://rapidshare.com/files/112425533/Spyware_Doctor_5.5.0.212.rar

Free N Full PC Games


COPY AND PASTE ANY GIVEN LINK'S IN THE ADDRESS BAR WHERE YOU WRITE WWW.NOKIAFANSITE.BLOGSPOT.COM


Paris Rally

Paris Dakar Rally RIP [271 MB]

Download this file to get the links to rar files

http://rapidshare.com/files/57188353/paris_dakar_links.txt

RAR Password for files:
www.maxgrab.org


Installation Notes:

1). Unrar and start game with > Start-ParisDakar.bat.

Trains & Trucks Tycoon english

Trains & Trucks Tycoon english Rip [164 MB]

Download this file to get the links to rar files

http://rapidshare.com/files/57188401/train_and_truck_tyc_links.txt

RAR Password for files:
www.maxgrab.org


Installation Notes:

1). Unrar and double click on > install-game.bat.
2). Launch game with Trains and Trucks Tycoon.exe.

Joint Operations: Typhoon Rising with Escalation Expension pack RIP [760 MB

Joint Operations: Typhoon Rising with Escalation Expension pack RIP [760 MB]

Download this file to get the links to rar files

http://rapidshare.com/files/57188348/joint_ops_links.txt

RAR Password for files:
www.maxgrab.org

Installation Notes:

1). Unrar and then unrar JO.7z.
2). Double-Click SETUP.reg to enter serial keys to registry -MUST BE DONE.
3). Double-Click PLAY ESCALATION.bat to launch 'Escalation'.
4). Double-Click PLAY TYPHOON RISING.bat to launch 'Typhoon Rising'

Hot Wheels World Race RIP [172 Mb]

Hot Wheels World Race RIP [172 Mb]

http://rapidshare.com/files/69202867/Hot.Whee.Worl.Race_-_max_grab.part1.rar
http://rapidshare.com/files/69204887/Hot.Whee.Worl.Race_-_max_grab.part2.rar
RAR Password:
www.maxgrab.org

Installation Notes:

1). Unrar and double click on > start-game.exe < (must be done).

Alien Shooter: Vengeance RIP [831 MB]

Alien Shooter: Vengeance RIP [831 MB]

http://rapidshare.com/files/52667153/Alie_Shoot-Vengean_RIP_.part01.rar
http://rapidshare.com/files/52671267/Alie_Shoot-Vengean_RIP_.part02.rar
http://rapidshare.com/files/52675229/Alie_Shoot-Vengean_RIP_.part03.rar
http://rapidshare.com/files/52678956/Alie_Shoot-Vengean_RIP_.part04.rar
http://rapidshare.com/files/52682675/Alie_Shoot-Vengean_RIP_.part05.rar
http://rapidshare.com/files/52685773/Alie_Shoot-Vengean_RIP_.part06.rar
http://rapidshare.com/files/52689434/Alie_Shoot-Vengean_RIP_.part07.rar
http://rapidshare.com/files/52692766/Alie_Shoot-Vengean_RIP_.part08.rar
http://rapidshare.com/files/52694644/Alie_Shoot-Vengean_RIP_.part09.rar

RAR Password:
www.maxgrab.org

Installation Notes:

1). Unrar ASV.7z with latest winrar and Start with AlienShooter.exe

Geoff Crammond's Grand Prix 4 RIP [464 MB]

Geoff Crammond's Grand Prix 4 RIP [464 MB]

http://rapidshare.com/files/68557913/Geoff___Crammon_Grand_Prix__4_max_grab.part1.rar
http://rapidshare.com/files/68560306/Geoff___Crammon_Grand_Prix__4_max_grab.part2.rar
http://rapidshare.com/files/68563075/Geoff___Crammon_Grand_Prix__4_max_grab.part3.rar
http://rapidshare.com/files/68565611/Geoff___Crammon_Grand_Prix__4_max_grab.part4.rar
http://rapidshare.com/files/68567457/Geoff___Crammon_Grand_Prix__4_max_grab.part5.rar
RAR Password:
www.maxgrab.org

Installation Notes:

1). Unrar and Start with GP4.exe.

Condemned: Criminal Origins RIP [1.46 GB]

Condemned: Criminal Origins RIP [1.46 GB]

http://rapidshare.com/files/53050383/Condem_Crimina_Origin_rip.part01.rar
http://rapidshare.com/files/53051410/Condem_Crimina_Origin_rip.part02.rar
http://rapidshare.com/files/53057735/Condem_Crimina_Origin_rip.part03.rar
http://rapidshare.com/files/53057999/Condem_Crimina_Origin_rip.part04.rar
http://rapidshare.com/files/53058934/Condem_Crimina_Origin_rip.part05.rar
http://rapidshare.com/files/53059329/Condem_Crimina_Origin_rip.part06.rar
http://rapidshare.com/files/53060029/Condem_Crimina_Origin_rip.part07.rar
http://rapidshare.com/files/53060323/Condem_Crimina_Origin_rip.part08.rar
http://rapidshare.com/files/53061283/Condem_Crimina_Origin_rip.part09.rar
http://rapidshare.com/files/53061792/Condem_Crimina_Origin_rip.part10.rar
http://rapidshare.com/files/53062794/Condem_Crimina_Origin_rip.part11.rar
http://rapidshare.com/files/53063150/Condem_Crimina_Origin_rip.part12.rar
http://rapidshare.com/files/53499578/Condem_Crimina_Origin_rip.part13.rar
http://rapidshare.com/files/53056521/Condem_Crimina_Origin_rip.part14.rar
http://rapidshare.com/files/53056867/Condem_Crimina_Origin_rip.part15.rar
http://rapidshare.com/files/53056915/Condem_Crimina_Origin_rip.part16.rar

RAR Password:
www.maxgrab.org

Installation Notes:

1). Unrar and run setup.bat when asked to add necesery keys to the registry click ok.Play with Condemned.exe .

MTX Mototrax RIP [387 MB]

MTX Mototrax RIP [387 MB]

http://rapidshare.com/files/68589366/MTX_Mototr______Motocros_max_grab.part1.rar
http://rapidshare.com/files/68591740/MTX_Mototr______Motocros_max_grab.part2.rar
http://rapidshare.com/files/68594403/MTX_Mototr______Motocros_max_grab.part3.rar
http://rapidshare.com/files/68596636/MTX_Mototr______Motocros_max_grab.part4.rar
RAR Password:
www.maxgrab.org

Installation Notes:

1). Unrar and Double-click Config.exe -adjust your settings, save and exit the window-
2). Start again with MTX.exe in /game folder.

Tomb Raider Legend [RIP]

Tomb Raider Legend [RIP]

http://rapidshare.com/files/37865163/Tomb_Raider_Legend_by_WewWew.part01.rar
http://rapidshare.com/files/37864838/Tomb_Raider_Legend_by_WewWew.part02.rar
http://rapidshare.com/files/37865619/Tomb_Raider_Legend_by_WewWew.part03.rar
http://rapidshare.com/files/37866462/Tomb_Raider_Legend_by_WewWew.part04.rar
http://rapidshare.com/files/37866938/Tomb_Raider_Legend_by_WewWew.part05.rar
http://rapidshare.com/files/37867910/Tomb_Raider_Legend_by_WewWew.part06.rar
http://rapidshare.com/files/37868464/Tomb_Raider_Legend_by_WewWew.part07.rar
http://rapidshare.com/files/37869711/Tomb_Raider_Legend_by_WewWew.part08.rar
http://rapidshare.com/files/37870344/Tomb_Raider_Legend_by_WewWew.part09.rar
http://rapidshare.com/files/37871138/Tomb_Raider_Legend_by_WewWew.part10.rar
http://rapidshare.com/files/37872105/Tomb_Raider_Legend_by_WewWew.part11.rar
http://rapidshare.com/files/37872697/Tomb_Raider_Legend_by_WewWew.part12.rar
http://rapidshare.com/files/37873169/Tomb_Raider_Legend_by_WewWew.part13.rar
http://rapidshare.com/files/37873939/Tomb_Raider_Legend_by_WewWew.part14.rar
http://rapidshare.com/files/37873971/Tomb_Raider_Legend_by_WewWew.part15.rar

Pass:
www.mavioyun.org

Lord of the Rings - Return of the King RiP [281 MB]

Lord of the Rings - Return of the King RiP [281 MB]

http://rapidshare.com/files/69207321/Lor_of_the_Ring_rip_max_grab.part1.rar
http://rapidshare.com/files/69209920/Lor_of_the_Ring_rip_max_grab.part2.rar
http://rapidshare.com/files/69212275/Lor_of_the_Ring_rip_max_grab.part3.rar

RAR Password:
www.maxgrab.org

here is part 7 of the archive which winrar asks for after extraction

http://rapidshare.com/files/81889665/PC_Lord_of_the_Rings_-RotK-__RiP_-_ToeD_.part7.rar

(needs atleast 1,5 gigs free space on yer hd!)

Installation Notes:
1). Unrar double click ToeD.exe
2). Launch Game with ROTK.exe (youll find in gamefolder)
(any otherway of installing does NOT work)

Silent Hill 4 The Room RIP [1.25 GB]

Silent Hill 4 The Room RIP [1.25 GB]

http://rapidshare.com/files/68828239/Silen_Hill_4_T_Room_max_grab.part01.rar
http://rapidshare.com/files/68832867/Silen_Hill_4_T_Room_max_grab.part02.rar
http://rapidshare.com/files/68837253/Silen_Hill_4_T_Room_max_grab.part03.rar
http://rapidshare.com/files/68841505/Silen_Hill_4_T_Room_max_grab.part04.rar
http://rapidshare.com/files/68845908/Silen_Hill_4_T_Room_max_grab.part05.rar
http://rapidshare.com/files/68849958/Silen_Hill_4_T_Room_max_grab.part06.rar
http://rapidshare.com/files/68853706/Silen_Hill_4_T_Room_max_grab.part07.rar
http://rapidshare.com/files/68857218/Silen_Hill_4_T_Room_max_grab.part08.rar
http://rapidshare.com/files/68860557/Silen_Hill_4_T_Room_max_grab.part09.rar
http://rapidshare.com/files/68863915/Silen_Hill_4_T_Room_max_grab.part10.rar
http://rapidshare.com/files/68867117/Silen_Hill_4_T_Room_max_grab.part11.rar
http://rapidshare.com/files/68870386/Silen_Hill_4_T_Room_max_grab.part12.rar
http://rapidshare.com/files/68873649/Silen_Hill_4_T_Room_max_grab.part13.rar
http://rapidshare.com/files/68874311/Silen_Hill_4_T_Room_max_grab.part14.rar

RAR Password:
www.maxgrab.org

Installation Notes:

1). Unrar and then unrar SH4.rar.
2). double-click setup.bat -relax as game decompresses
3). Be sure to click yes when asked to enter registry entries. start with SILENT HILL
4.exe

Tom Clancy's Splinter Cell Chaos Theory RIP [1.33 GB]

Tom Clancy's Splinter Cell Chaos Theory RIP [1.33 GB]

http://rapidshare.com/files/68877330/Splinte_CC_Theory_max_grab.part01.rar
http://rapidshare.com/files/68880142/Splinte_CC_Theory_max_grab.part02.rar
http://rapidshare.com/files/68882998/Splinte_CC_Theory_max_grab.part03.rar
http://rapidshare.com/files/68885494/Splinte_CC_Theory_max_grab.part04.rar
http://rapidshare.com/files/68887981/Splinte_CC_Theory_max_grab.part05.rar
http://rapidshare.com/files/68890344/Splinte_CC_Theory_max_grab.part06.rar
http://rapidshare.com/files/68892475/Splinte_CC_Theory_max_grab.part07.rar
http://rapidshare.com/files/68894574/Splinte_CC_Theory_max_grab.part08.rar
http://rapidshare.com/files/68896392/Splinte_CC_Theory_max_grab.part09.rar
http://rapidshare.com/files/68898712/Splinte_CC_Theory_max_grab.part10.rar
http://rapidshare.com/files/68900856/Splinte_CC_Theory_max_grab.part11.rar
http://rapidshare.com/files/68902978/Splinte_CC_Theory_max_grab.part12.rar
http://rapidshare.com/files/68905241/Splinte_CC_Theory_max_grab.part13.rar
http://rapidshare.com/files/68907711/Splinte_CC_Theory_max_grab.part14.rar
http://rapidshare.com/files/68907790/Splinte_CC_Theory_max_grab.part15.rar

RAR Password:
www.maxgrab.org

Installation Notes:

1). Unrar and then unrar TCSCCT.7z.
2). start with SPLINTERCELL3.EXE in games /system folder.
(You can test and detect proper settings in the games /detection folder with detectionui_r.exe.)

Far Cry RIP [1.49 GB]

Far Cry RIP [1.49 GB]

http://rapidshare.com/files/69756141/far_cry_rip__max_grab.part01.rar
http://rapidshare.com/files/69759425/far_cry_rip__max_grab.part02.rar
http://rapidshare.com/files/69762524/far_cry_rip__max_grab.part03.rar
http://rapidshare.com/files/69765717/far_cry_rip__max_grab.part04.rar
http://rapidshare.com/files/69768740/far_cry_rip__max_grab.part05.rar
http://rapidshare.com/files/69771699/far_cry_rip__max_grab.part06.rar
http://rapidshare.com/files/69774608/far_cry_rip__max_grab.part07.rar
http://rapidshare.com/files/69776982/far_cry_rip__max_grab.part08.rar
http://rapidshare.com/files/69779403/far_cry_rip__max_grab.part09.rar
http://rapidshare.com/files/69781723/far_cry_rip__max_grab.part10.rar
http://rapidshare.com/files/69784173/far_cry_rip__max_grab.part11.rar
http://rapidshare.com/files/69786222/far_cry_rip__max_grab.part12.rar
http://rapidshare.com/files/69788328/far_cry_rip__max_grab.part13.rar
http://rapidshare.com/files/69790277/far_cry_rip__max_grab.part14.rar
http://rapidshare.com/files/69792120/far_cry_rip__max_grab.part15.rar
http://rapidshare.com/files/69793454/far_cry_rip__max_grab.part16.rar

RAR Password:
www.maxgrab.org

Installation Notes:

1). Unrar and start with FarCry.exe in \bin32 folder.

Medal of Honor: Airborne RIP [3.10 GB]

Medal of Honor: Airborne RIP [3.10 GB]

http://rapidshare.com/files/55376779/Meda_o_Hono_Airbor__RIP_.part01.rar
http://rapidshare.com/files/55379489/Meda_o_Hono_Airbor__RIP_.part02.rar
http://rapidshare.com/files/55383632/Meda_o_Hono_Airbor__RIP_.part03.rar
http://rapidshare.com/files/55388422/Meda_o_Hono_Airbor__RIP_.part04.rar
http://rapidshare.com/files/55392772/Meda_o_Hono_Airbor__RIP_.part05.rar
http://rapidshare.com/files/55398179/Meda_o_Hono_Airbor__RIP_.part06.rar
http://rapidshare.com/files/55402872/Meda_o_Hono_Airbor__RIP_.part07.rar
http://rapidshare.com/files/55408121/Meda_o_Hono_Airbor__RIP_.part08.rar
http://rapidshare.com/files/55414754/Meda_o_Hono_Airbor__RIP_.part09.rar
http://rapidshare.com/files/55427177/Meda_o_Hono_Airbor__RIP_.part10.rar
http://rapidshare.com/files/55436377/Meda_o_Hono_Airbor__RIP_.part11.rar
http://rapidshare.com/files/55445391/Meda_o_Hono_Airbor__RIP_.part12.rar
http://rapidshare.com/files/55453751/Meda_o_Hono_Airbor__RIP_.part13.rar
http://rapidshare.com/files/55462786/Meda_o_Hono_Airbor__RIP_.part14.rar
http://rapidshare.com/files/55471799/Meda_o_Hono_Airbor__RIP_.part15.rar
http://rapidshare.com/files/55480797/Meda_o_Hono_Airbor__RIP_.part16.rar
http://rapidshare.com/files/55489368/Meda_o_Hono_Airbor__RIP_.part17.rar
http://rapidshare.com/files/55498474/Meda_o_Hono_Airbor__RIP_.part18.rar
http://rapidshare.com/files/55507218/Meda_o_Hono_Airbor__RIP_.part19.rar
http://rapidshare.com/files/55515760/Meda_o_Hono_Airbor__RIP_.part20.rar
http://rapidshare.com/files/55528501/Meda_o_Hono_Airbor__RIP_.part21.rar
http://rapidshare.com/files/55542359/Meda_o_Hono_Airbor__RIP_.part22.rar
http://rapidshare.com/files/55560804/Meda_o_Hono_Airbor__RIP_.part23.rar
http://rapidshare.com/files/55568935/Meda_o_Hono_Airbor__RIP_.part24.rar
http://rapidshare.com/files/55577015/Meda_o_Hono_Airbor__RIP_.part25.rar
http://rapidshare.com/files/55585691/Meda_o_Hono_Airbor__RIP_.part26.rar
http://rapidshare.com/files/55592129/Meda_o_Hono_Airbor__RIP_.part27.rar
http://rapidshare.com/files/55595024/Meda_o_Hono_Airbor__RIP_.part28.rar
http://rapidshare.com/files/55597803/Meda_o_Hono_Airbor__RIP_.part29.rar
http://rapidshare.com/files/55600441/Meda_o_Hono_Airbor__RIP_.part30.rar
http://rapidshare.com/files/55603028/Meda_o_Hono_Airbor__RIP_.part31.rar
http://rapidshare.com/files/55605883/Meda_o_Hono_Airbor__RIP_.part32.rar
http://rapidshare.com/files/55608509/Meda_o_Hono_Airbor__RIP_.part33.rar
http://rapidshare.com/files/55373567/Meda_o_Hono_Airbor__RIP_.part34.rar

RAR Password:
www.maxgrab.org

Installation Notes:

1). Unrar and then unrar MOHA.7z
2). Install the PhysX engine, Vc runtimes & DX9 inside the Here_First!! folder.
3). Start with MOHA.exe in- Medal of Honor Airborne\UnrealEngine3\Binaries folder.

Grand Theft Auto: San Andreas RIP [608 MB]

Grand Theft Auto: San Andreas RIP [608 MB]

http://rapidshare.com/files/69187687/GTA.SanAndreas_-_rip__max_grab.part1.rar
http://rapidshare.com/files/69189813/GTA.SanAndreas_-_rip__max_grab.part2.rar
http://rapidshare.com/files/69191984/GTA.SanAndreas_-_rip__max_grab.part3.rar
http://rapidshare.com/files/69194351/GTA.SanAndreas_-_rip__max_grab.part4.rar
http://rapidshare.com/files/69196933/GTA.SanAndreas_-_rip__max_grab.part5.rar
http://rapidshare.com/files/69199537/GTA.SanAndreas_-_rip__max_grab.part6.rar
http://rapidshare.com/files/69200252/GTA.SanAndreas_-_rip__max_grab.part7.rar

RAR Password:
www.maxgrab.org

Installation Notes:

1). unrar archive and double click >_install.bat
2) . Start game with .exe file

Formula One 2006 RIP [532 Mb]

Formula One 2006 RIP [532 Mb]

http://rapidshare.com/files/52698120/Formul_1_06__ENGRIP_.part1.rar
http://rapidshare.com/files/52702281/Formul_1_06__ENGRIP_.part2.rar
http://rapidshare.com/files/52705621/Formul_1_06__ENGRIP_.part3.rar
http://rapidshare.com/files/52708976/Formul_1_06__ENGRIP_.part4.rar
http://rapidshare.com/files/52712925/Formul_1_06__ENGRIP_.part5.rar
http://rapidshare.com/files/52714762/Formul_1_06__ENGRIP_.part6.rar

RAR Password:
www.maxgrab.org

Installation Notes:

1). unrar F1.7z with latest winrar
2). Start with F1 2006.exe and follow through automated gfx setup .

Freight Tycoon Inc. RIP [221 MB]

Freight Tycoon Inc. RIP [221 MB]

http://rapidshare.com/files/69184924/Frei___Tycoo__RIP_max_grab.part1.rar
http://rapidshare.com/files/69186056/Frei___Tycoo__RIP_max_grab.part2.rar
http://rapidshare.com/files/69186373/Frei___Tycoo__RIP_max_grab.part3.rar

RAR Password:
www.maxgrab.org

Installation Notes:

1). Unrar and run setup.bat, play with tycoon.exe.

TrackMania Sunrise eXtreme

TrackMania Sunrise eXtreme(addon for sunrise) -English RIP [379 MB]

http://rapidshare.com/files/52364171/Track.Man.Sun.Extreme._rip_.part1.rar
http://rapidshare.com/files/52366125/Track.Man.Sun.Extreme._rip_.part2.rar
http://rapidshare.com/files/52368041/Track.Man.Sun.Extreme._rip_.part3.rar
http://rapidshare.com/files/52369612/Track.Man.Sun.Extreme._rip_.part4.rar

RAR Password:
www.maxgrab.org

F.E.A.R. (First Encounter Assault Recon) RIP [1.46 GB]

F.E.A.R. (First Encounter Assault Recon) RIP [1.46 GB]

http://rapidshare.com/files/69706425/F._E._A._R._RIP___max_grab.part01.rar
http://rapidshare.com/files/69709439/F._E._A._R._RIP___max_grab.part02.rar
http://rapidshare.com/files/69712579/F._E._A._R._RIP___max_grab.part03.rar
http://rapidshare.com/files/69715534/F._E._A._R._RIP___max_grab.part04.rar
http://rapidshare.com/files/69718656/F._E._A._R._RIP___max_grab.part05.rar
http://rapidshare.com/files/69721861/F._E._A._R._RIP___max_grab.part06.rar
http://rapidshare.com/files/69724753/F._E._A._R._RIP___max_grab.part07.rar
http://rapidshare.com/files/69728099/F._E._A._R._RIP___max_grab.part08.rar
http://rapidshare.com/files/69731159/F._E._A._R._RIP___max_grab.part09.rar
http://rapidshare.com/files/69734720/F._E._A._R._RIP___max_grab.part10.rar
http://rapidshare.com/files/69738629/F._E._A._R._RIP___max_grab.part11.rar
http://rapidshare.com/files/69742364/F._E._A._R._RIP___max_grab.part12.rar
http://rapidshare.com/files/69745493/F._E._A._R._RIP___max_grab.part13.rar
http://rapidshare.com/files/69748806/F._E._A._R._RIP___max_grab.part14.rar
http://rapidshare.com/files/69751851/F._E._A._R._RIP___max_grab.part15.rar
http://rapidshare.com/files/69753191/F._E._A._R._RIP___max_grab.part16.rar

RAR Password:
www.maxgrab.org

Installation Notes:

1). unrar once then again unrar F.E.A.R.7z with latest winrar.
2). Double-click setup.reg in game folder
3). Start with fear.exe.

Call of Duty RIP [425 MB]

Call of Duty RIP [425 MB]

http://rapidshare.com/files/76453801/C_of_Duty_1_rip_max_grab.part1.rar
http://rapidshare.com/files/76454462/C_of_Duty_1_rip_max_grab.part2.rar
http://rapidshare.com/files/76455281/C_of_Duty_1_rip_max_grab.part3.rar
http://rapidshare.com/files/76456041/C_of_Duty_1_rip_max_grab.part4.rar
http://rapidshare.com/files/76456300/C_of_Duty_1_rip_max_grab.part5.rar

RAR Password:
www.maxgrab.org

Installation Notes:

1). Double click > Duty-Free.bat <> codsp.exe < (look into folder crack for the latest no cd.exe file (version 1.3, works great!)

Pirates of the Caribbean: At World's End RIP +4 Trainer! [138 MB]

Pirates of the Caribbean: At World's End RIP +4 Trainer! [138 MB]

http://rapidshare.com/files/69632934/Pir_of_Carib.World.End_Rip__max_grab.part1.rar
http://rapidshare.com/files/69634666/Pir_of_Carib.World.End_Rip__max_grab.part2.rar

RAR Password:
www.maxgrab.org

Installation Notes:

1) double click PC_Pirate of Caribbean.awe Rip+4.exe and choose folder
2) double click > ToeD.exe <> .exe <>

Urban Freestyle Soccer RiP [248 MB]

Urban Freestyle Soccer RiP [248 MB]

http://rapidshare.com/files/68601534/Urban_Free_Soccer_max_grab.part1.rar
http://rapidshare.com/files/68603877/Urban_Free_Soccer_max_grab.part2.rar
http://rapidshare.com/files/68605195/Urban_Free_Soccer_max_grab.part3.rar

Or

http://www.filefactory.com/file/984ac0/
http://www.filefactory.com/file/2e02d0/
http://www.filefactory.com/file/2d200e/

RAR Password:
www.maxgrab.org

Installation Notes:

1). UnRAR
2). Run setup.bat
3). Play game

Chess Master 10th Edition Rip [193 MB]

Chess Master 10th Edition Rip [193 MB]

http://rapidshare.com/files/68537433/Chess_____Mastr_10th_rip_max_grab.part1.rar
http://rapidshare.com/files/68539839/Chess_____Mastr_10th_rip_max_grab.part2.rar
http://rapidshare.com/files/68539856/Chess_____Mastr_10th_rip_max_grab.part3.rar

RAR Password:
www.maxgrab.org

Installation Notes:

1). Unrar and Start will Chessmaster.exe.

Just Cause Rip + Addons [493 Mb]

Just Cause Rip + Addons [493 Mb]

http://rapidshare.com/files/68570147/jc_max_grab.part1.rar
http://rapidshare.com/files/68572923/jc_max_grab.part2.rar
http://rapidshare.com/files/68575939/jc_max_grab.part3.rar
http://rapidshare.com/files/68578802/jc_max_grab.part4.rar
http://rapidshare.com/files/68581649/jc_max_grab.part5.rar
http://rapidshare.com/files/68581834/jc_max_grab.part6.rar

RAR Password:
www.maxgrab.org

Installation Notes:

1). Unrar and run Just cause multi 5.exe select Language and play.

Tomb Raider Anniversary RIP [699 MB]

Tomb Raider Anniversary RIP [699 MB]

http://rapidshare.com/files/51848438/Tom_Raid_Anniver_rip.part1.rar
http://rapidshare.com/files/51850363/Tom_Raid_Anniver_rip.part2.rar
http://rapidshare.com/files/51851907/Tom_Raid_Anniver_rip.part3.rar
http://rapidshare.com/files/51853527/Tom_Raid_Anniver_rip.part4.rar
http://rapidshare.com/files/51855263/Tom_Raid_Anniver_rip.part5.rar
http://rapidshare.com/files/51857266/Tom_Raid_Anniver_rip.part6.rar
http://rapidshare.com/files/51859059/Tom_Raid_Anniver_rip.part7.rar
http://rapidshare.com/files/51859378/Tom_Raid_Anniver_rip.part8.rar

RAR Password:
www.maxgrab.org

Installation Notes:

1). UnRAR
2). Run setup.bat
3). Play game

Driver Parallel Lines RIP [840 MB]

Driver Parallel Lines RIP [840 MB]

http://rapidshare.com/files/69168355/drive_rip_max_grab.part01.rar
http://rapidshare.com/files/69170404/drive_rip_max_grab.part02.rar
http://rapidshare.com/files/69172406/drive_rip_max_grab.part03.rar
http://rapidshare.com/files/69174376/drive_rip_max_grab.part04.rar
http://rapidshare.com/files/69176244/drive_rip_max_grab.part05.rar
http://rapidshare.com/files/69178306/drive_rip_max_grab.part06.rar
http://rapidshare.com/files/69180337/drive_rip_max_grab.part07.rar
http://rapidshare.com/files/69182656/drive_rip_max_grab.part08.rar
http://rapidshare.com/files/69183616/drive_rip_max_grab.part09.rar

RAR Password:
www.maxgrab.org

Speech Addon : 520mb

http://rapidshare.com/files/41546728/MY.Driving.audio.part1.rar
http://rapidshare.com/files/41564679/MY.Driving.audio.part2.rar
http://rapidshare.com/files/41572690/MY.Driving.audio.part3.rar
http://rapidshare.com/files/41579466/MY.Driving.audio.part4.rar
http://rapidshare.com/files/41580740/MY.Driving.audio.part5.rar

Pass = demon6666

Installation Notes:

1). Unrar and extract inf.parallel.lines.zip and run setup.exe.

Harry Potter and the Order of the Phoenix RIP [591 Mb]

Harry Potter and the Order of the Phoenix RIP [591 Mb]

http://rapidshare.com/files/69157489/harry_ptp_rip_max_grab.part1.rar
http://rapidshare.com/files/69159248/harry_ptp_rip_max_grab.part2.rar
http://rapidshare.com/files/69160927/harry_ptp_rip_max_grab.part3.rar
http://rapidshare.com/files/69162775/harry_ptp_rip_max_grab.part4.rar
http://rapidshare.com/files/69164683/harry_ptp_rip_max_grab.part5.rar
http://rapidshare.com/files/69166450/harry_ptp_rip_max_grab.part6.rar
http://rapidshare.com/files/69166595/harry_ptp_rip_max_grab.part7.rar

RAR Password:
www.maxgrab.org

if you have dll error use this:
http://rapidshare.com/files/51755901/xinput1_3.rar

Installation Notes:

1). Unrar and run setup.bat and wait, launch HTP.exe for play.

Drive Stealthing

Drive Stealthing Made Simple

You have by now probably seen many different drive stealthing guides on a lot of other mod sites with difficulty ranging from fairly easy to downright ludicrous. This guide is guaranteed easy and will show what I consider to be the hands down absolute best way to stealth a drive. The end result looks awesome, is entirely functional, completely removable and unlike a lot of other mods will not void your warranty. There must be some unwritten law that every case modding website is obligated to have a drive stealthing guide... having said that, here is ours.

Tools and Materials

- Nibbler

- Wire Cutters

- File

- Scissors

- Velcro Strip

- Double Sided Tape

Below are a couple of cover blanks for 5.25" bays, the top two are standard beige plastic covers and the bottom one is from a Lian Li case. I am going to use the Lian bezel cover plate for this guide because it is the more difficult of the two to do, but the plastic covers would be done about the same way.

Grab the nibbler and begin cutting off the side pieces, try to keep your line straight as you go. Once you get about half way through flip it over and start cutting in from the other side. If you have never nibbled before you need to know that it only cuts out a rice grain sized piece with every squeeze, but it sounds worse than it actually is. You could alternately use a dremel to remove the material, but it would probably take just as long to do.

Notice the small pile of nibbler turds in the lower right of the picture below... Ok, I will admit now that I was just looking for an excuse to use the term "nibbler turds". When the bay cover looks like the one below you can carefully bend the side flap off and then repeat the process for the other side, use wire cutters to cut through if you are unsure of your ability to bend it off correctly.

Ok, now that the sides are off proceed to remove the metal lip from the top and bottom. Use the nibbler to remove the edge material making sure to be careful not to remove too much. You just want it to be about flush and any fine tuning as far as shaping it will be done in the next step.

The file, it is one of my most frequently used modding tools and is once again called into action to smooth up all the rough edges left by the nibbler. File, file, file then check your progress and then file some more, below is the finished filed product.

Wipe off the tray door to your drive to remove any dirt, dust or oils from your hands, then take a strip of the double sided tape and stick it onto the door. Cut a length of Velcro and adhere that to the double sided tape as shown in the picture below. Your drive will have to be recessed a little further into the case to compensate for the added thickness of the tape and Velcro, just loosen the screws up and slide it back.

Take the other half of the Velcro and line it up on the inside of the bay cover, it doesn't have to be perfect but the closer the better. Using the Velcro as a guide I approximated the position of the eject button and started layering the double sided tape until it was three layers thick. Since we don't want the cover sticking to the eject button I cut a small piece of paper to stick onto the top of the tape. If you don't have the tape positioned correctly so that it hits the eject button simply remove it, wipe it down with some Goo-Gone to remove any tape residue and try again.

Take the cover plate and line it up with the drive, press it down good so that the Velcro sticks and you are basically done. Test it out by pressing the lower right corner to eject the drive tray, then reach under and push the eject button again to bring the tray back in. If the newly installed stealth cover doesn't close correctly simply remove it, reposition it and try it again.

Below is a top down shot showing the tape, Velcro and bay cover attached to the drive tray door.

And finally, a front shot of the open stealth drive. This mod is near fool proof, takes under an hour and costs next to nothing to do. If you get sick of reaching beneath to close the drive tray you can refer to our CD button re-routing guide for even more modding fun.

Game Cube Portable 5.6" LCD Screen Mod

Game Cube Portable 5.6" LCD Screen Mod

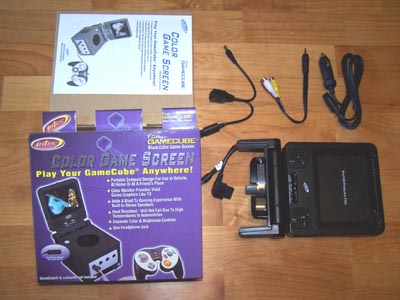
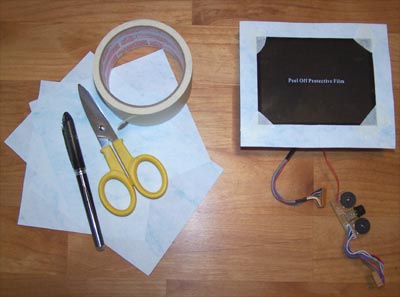
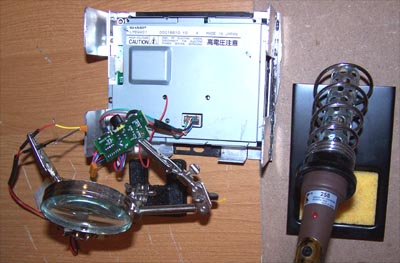
Last Spring I bought a Game Cube portable game screen from AllElectronics.com but didn't have time to mod it, at USD$54 it was a good deal and they sold out on them quick. The same screen can be had online with a little searching for $50-$95, below shows everything included.

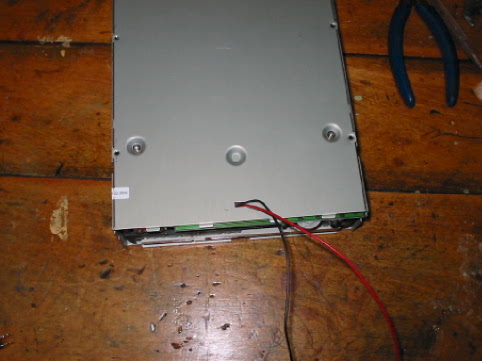
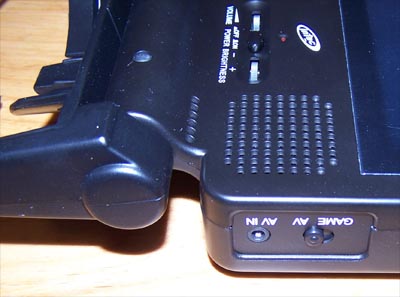
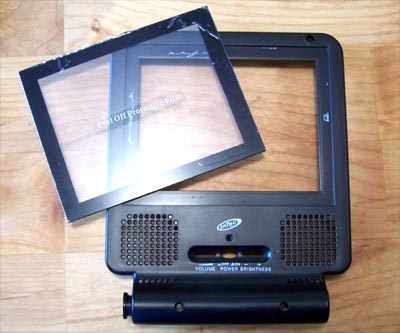
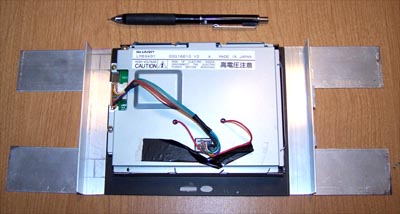
Here is a close up of the modding victim still all in one piece, on the face of the screen there is an on/off switch, power LED and dials for volume and brightness. There are speakers included as well, color those gone. The cables coming out of the left foot are for 12V DC and the other is the AV connector for the Game Cube.

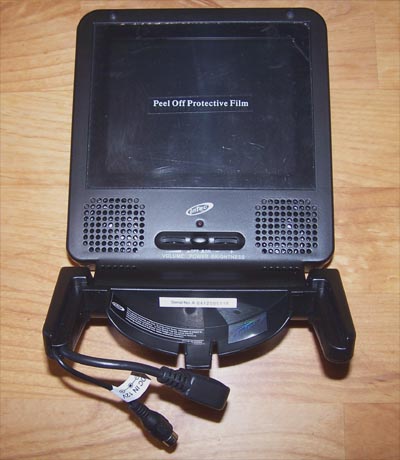
On the right hand side of the screen is the AV in and selector switch that toggle between the game and AV inputs.

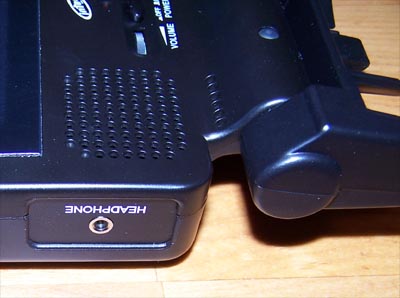
On the left hand side of the screen is a headphone jack, which will not be used in this mod.

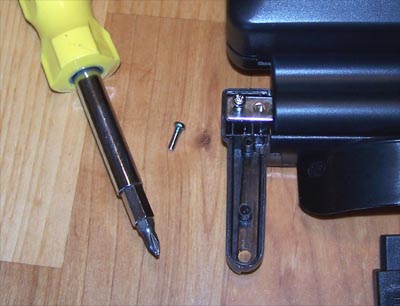
Time to break this thing open and see what makes it tick, first off there are rubber stoppers over the screws at the bottom of the screen that need to be removed, then remove the screws (as shown below) and flip it over.

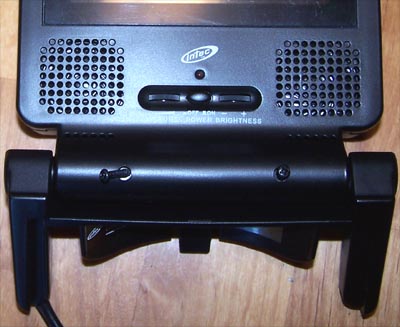
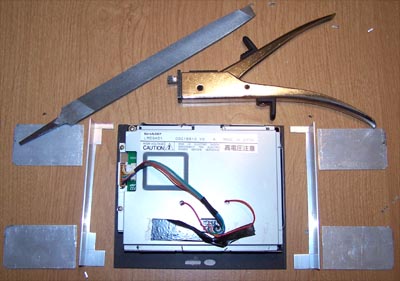
There are two screws on each leg that need to be removed...

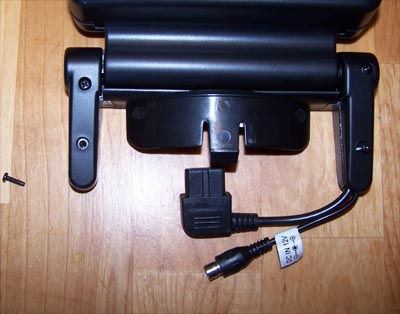
And two more screws to take out inside one leg, the whole bottom section can now be removed.

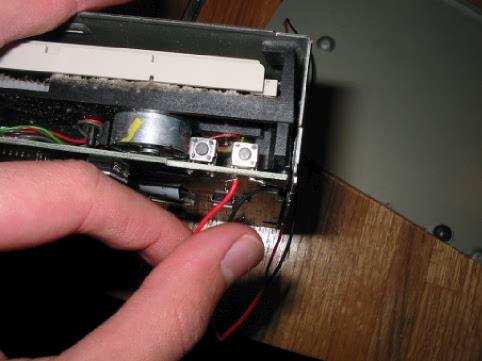
To separate the two halves of the plastic housing grab the plastic where it's split at the bottom of the screen and yank it apart, don't be afraid to be forceful because there is no graceful way, it's the only way it comes apart. Below shows where we're at...

The screen itself is just double side taped onto the front of the housing and comes up pretty easily.

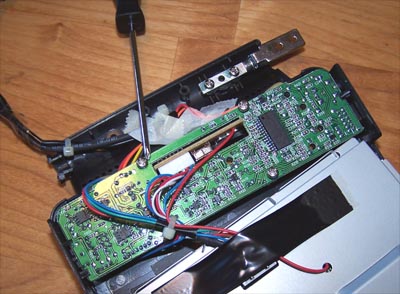
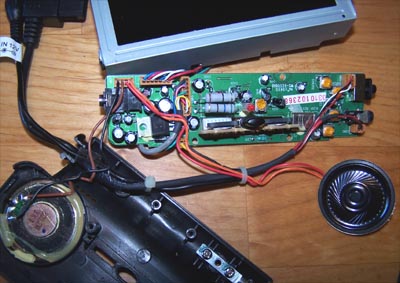
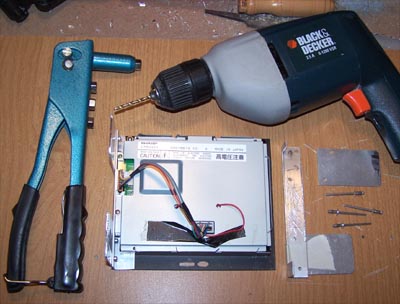
The screwdriver below is pointing to one of three screws that hold the PCB onto the housing, remove them all.

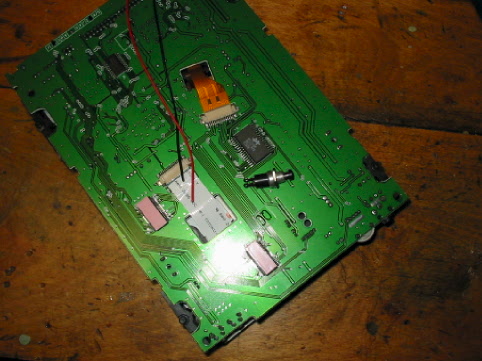
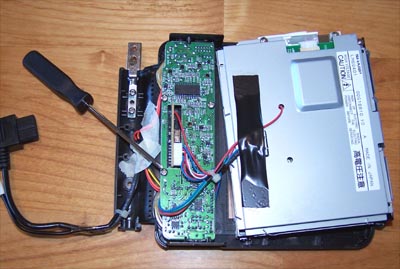
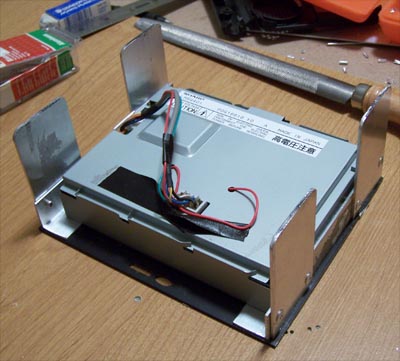
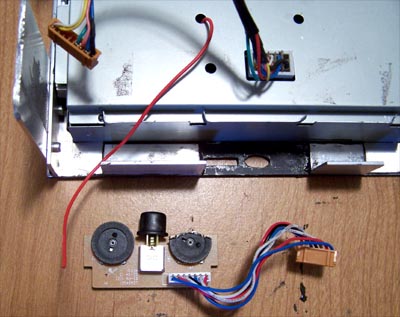
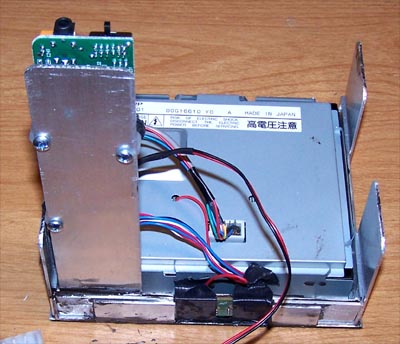
Here it is taken apart, I unplugged nearly everything from the PCB to make things easier to work with, the crappy little speakers will not be used in this mod.

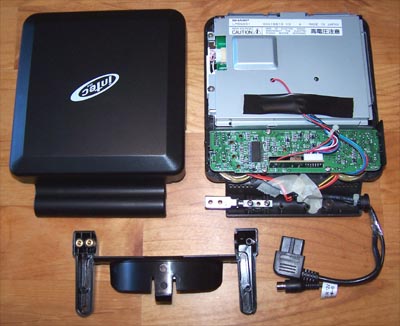
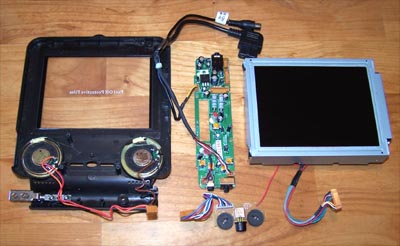
Below shows the Game Cube screen broke down into workable bite sized pieces and now that I can see what's involved it's time to formulate a plan. I did a little research and found the pin-out for the Game Cube cable, I don't plan to do it but the cable could be hacked into S-video fairly easily. Doing it would allow you to hook another device to the screen externally and be able to flip between them using the AV switch, but like the speakers it isn't necessary for this mod since I plan to lock the AV input switch in the on position and get the signal via the RCA video input.

"All things lively must be used" - Adam Ant. Pop out the plastic screen cover, it is just double stick taped on so start at a corner and peel it up.

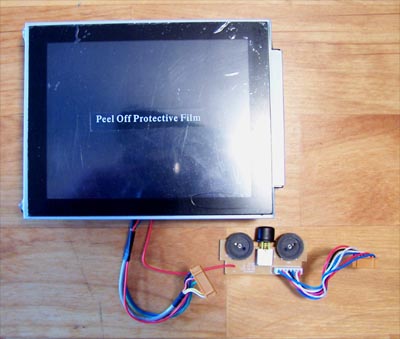
Carefully center the plastic piece over the screen and press it down, the tape residue on the front of the screen combined with what's on the plastic is enough to hold it in place so it can protect the bare LCD screen underneath.

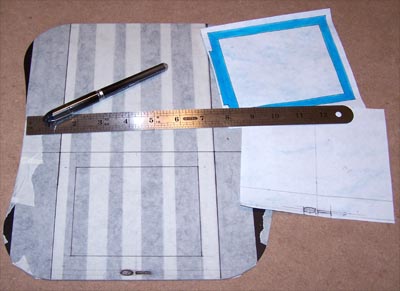
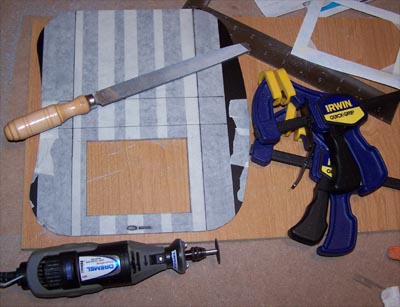
I drew up a couple paper templates for the face of the screen and taped it down so I can figure out the positioning.

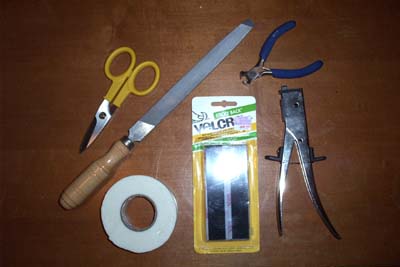
As for what material to use for the face of the mod I chose a Steelpad4S aluminum mouse pad that I no longer use, there is enough material to give me two tries at cutting it right.


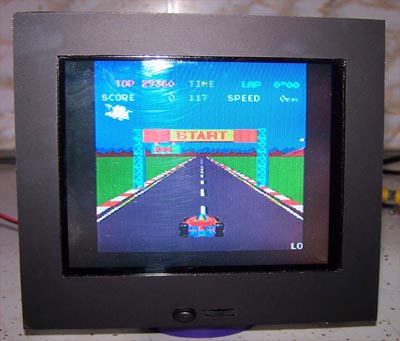
No sense in destroying a perfectly good mouse pad if the screen doesn't work so I wired it up and then fired it up... the picture below shows that it works beautifully.

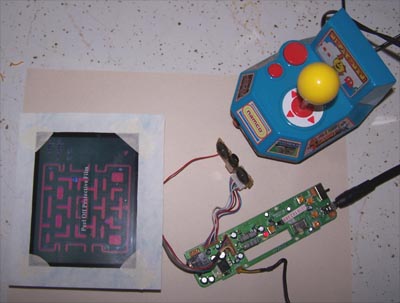
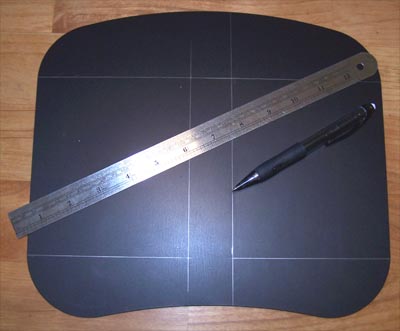
Steelpad4S, you served me well as a mouse pad but the time has finally come for you to suck Dremel and die... I mean that in a good way. Next step is to mask the mouse pad off, measure it up and mark down lines for cutting.

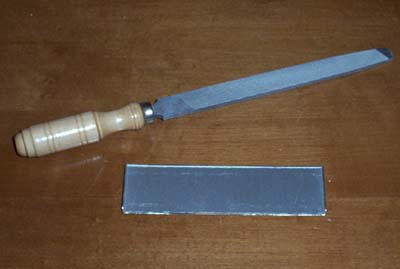
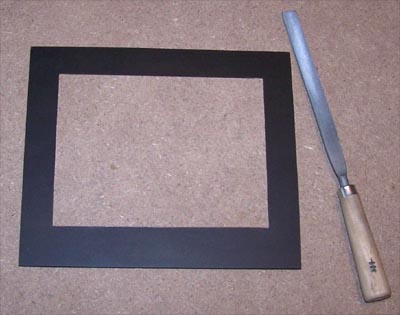
I cut the inside edges that sit next to the screen first, it's easier to do while the piece is whole rather than cutting the outside edges first and then fumbling with it, besides it allows you to keep your fingers further away from the rotary tool which is always good. I also filed off the inside edges up to the marked lines, then cut the outside lines and filed those edges as well.

I still have a little fine tuning to do with a file but it's looking good so far (see picture below) and I could almost leave it as is... almost. I'm going to cut the power and brightness controls into the bottom of the faceplate, it isn't in any way necessary for this mod to work, the controls could just as well be hidden behind it all. When the power button is left in the on position the screen will only power up when a signal is present anyway, but the front mounted controls (however unnecessary) will look cool.

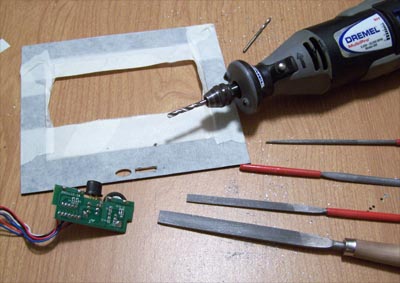
I masked the face plate off again, front and back, then measured and marked the location of the power button and brightness dial onto it. I carefully drilled out as much material as I could with the Dremel and then started filing away, testing for fit as I went.

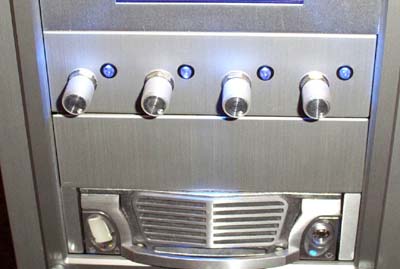
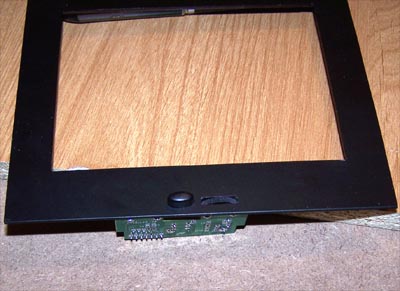
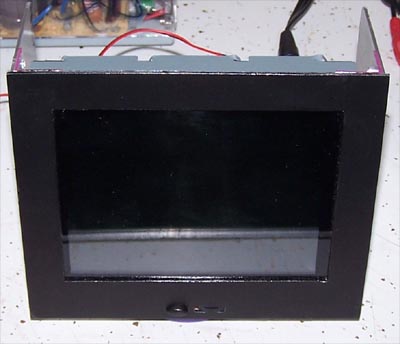
Below shows the final test fit, not too shabby. I used a marker to color in the bare aluminum edges around the button and dial as well as the rest of the face plate edges, paint will be used as a more permanent solution later.

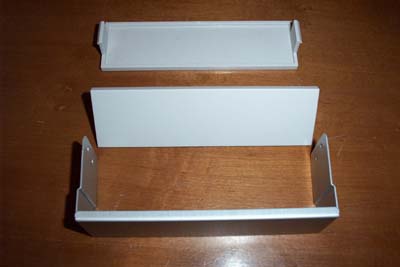
With the face plate made it is time to figure a way to mount the LCD into the PC, for this I used Alum-Angle. I marked the shape of the LCD onto the Alum-Angle in preparation for cutting.

I used a nibbler to cut the side pieces to shape and then filed everything smooth, I also nibbled and file rounded the forward edges of the mounting tabs.

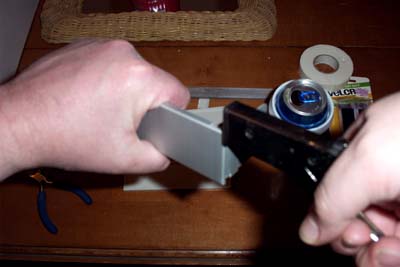
I measured out the best spots to connect the pieces together then drilled holes in the side pieces, traced the pattern onto the mounting tabs and drilled them out, I then rivet the parts together.

Below is a close up of one side of the riveting... it's actually both riveting and exciting.

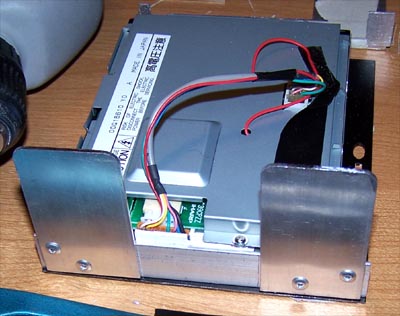
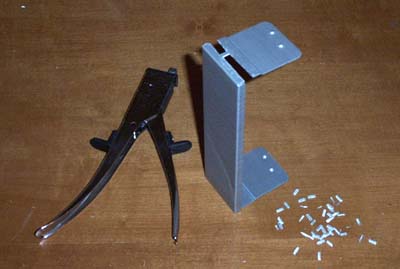
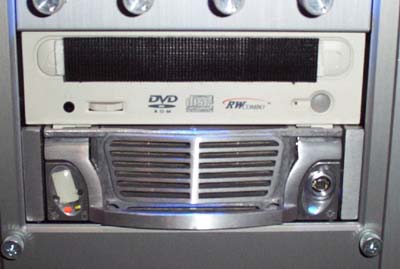
Both of the mounting brackets are finished and shown below in their final test fit, all that is left now is to connect everything together.

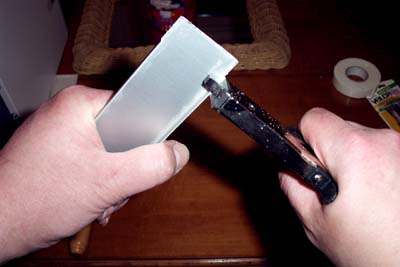
I used J-B Kwik to hold the Alum-Angle sides onto the edges of the screen and then roughened up the backside of the faceplate in prep for attaching the LCD.

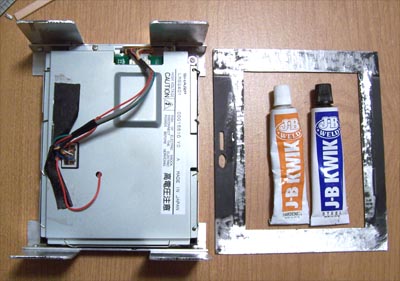
I mixed up some J-B Kwik and applied it around the edges of the faceplate, then carefully positioned the LCD on top of it. Next up is mounting the power button/brightness wheel PCB to the back of the face plate.

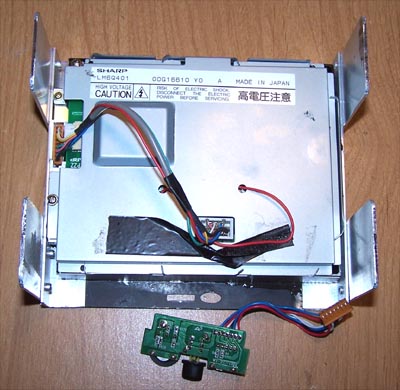
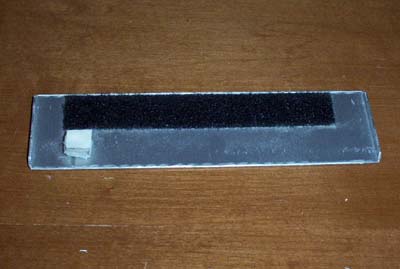
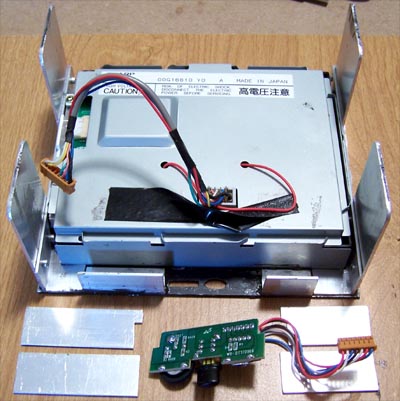
I used a piece of corner Alum-angle cut to fit, scuffed up and J-B Kwik'ed to the back of the face plate, the bottom corner edges of the PCB will sit on top of the Alum-angle. I cut two pieces of flat Alum-angle to fit the shape of the outside edges of the PCB and two more pieces to hold it all in place.

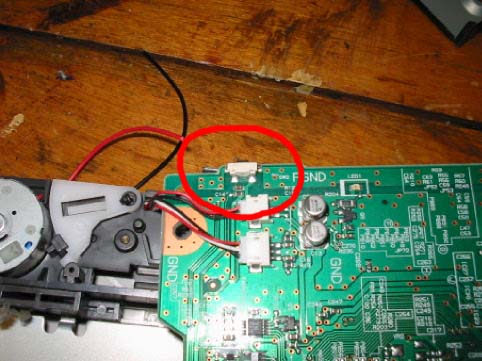
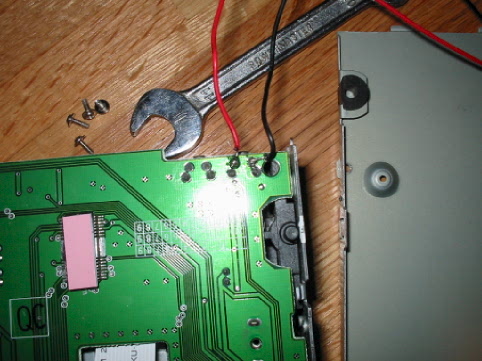
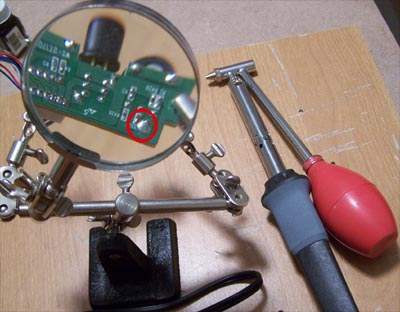
Before I can mount the controls I first have to fix them, early on in the mod the wire that goes from the back of the LCD to the PCB for the brightness wheel had broken off.

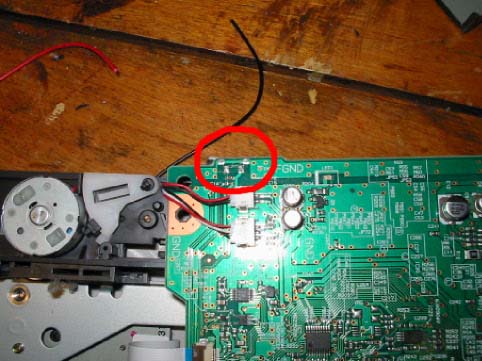
No big deal, the glob of solder circled in red needs to be removed before I can reattach the wiring... the $11 de-soldering iron shown below made short work of it


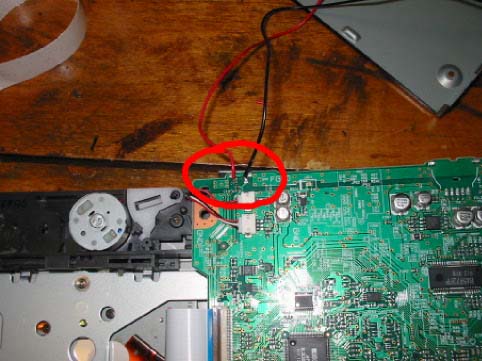
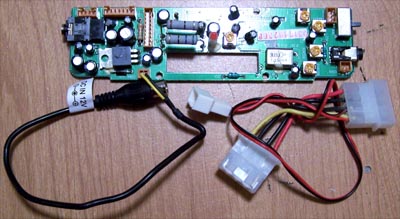
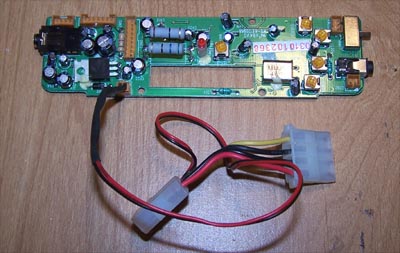
I decided that before I broke out the soldering iron it would be a good idea to wire up the power connector to the controller board and solder everything at once. Below shows the power connector cable on the left and a molex pass through power cable on the right.

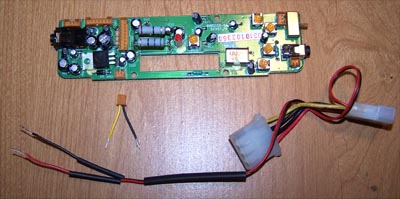
The following picture shows both cables cut, the wires stripped back and heat shrink tubing slid onto the power cable wires.

I used a helping hands magnifier to hold the power wire and control PCB in preparation for soldering, two minutes later it was done.

I fit the heat shrink tubing over the soldered wiring and used a lighter to heat it up, below shows the new power cable plugged into the controller board.

I cut a piece of flat Alum-angle to mount the controller board onto, I marked and drilled mounting holes, scuffed up the bottom edge and then J-B Kwik'ed it into place.

I used nylon spacers to hold the board away from the aluminum and a screw with a rubber grommet between the nut and PCB.

Since I do not currently have a PC with three open bays to fit this mod into I will wait to mark and drill the case mounting holes on the side brackets of the LCD.

Which also means that the best in action shots I can provide at the moment are pumped out of a Namco hand held video game while sitting on a counter, it does however show that the mod will work in a PC via RCA composite video.

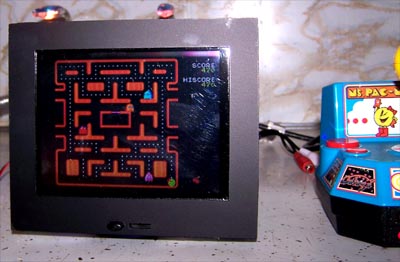
The degree of viewing angle for the LCD is kind of weak meaning you have to be almost right in front of it for it to show correctly, but the colors are bright and the image is fairly crisp.

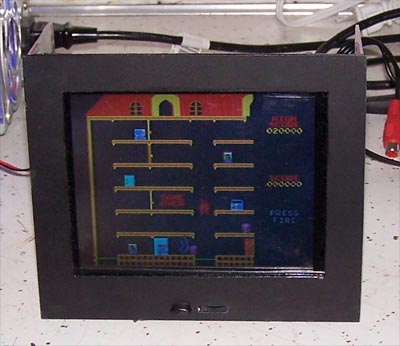
Mappy, I never really liked that game... I measured the heat out put of the LCD using an infrared thermometer, heat was minimal around the screen though there is a hot spot on the controller board that measured 105ºF.

If I had more time I would have hacked the GameCube AV cable into S-video and flipped the controller board over so that the input for composite video and the AV switch were accessible on the face plate... if I find time later I still might.

On my screen I used the original plastic that covered the screen but now wish that I hadn't as it scratches far too easily, better to not cover the screen with anything. Another thing that bugs me is that the mod takes up three 5.25" bays, if I do end up putting this LCD mod into a system I will make some brackets to mount a couple hard drives behind the screen... wasted space is just that.

Happy Modding

Goodbye,thanx for visiting

eXTReMe Tracker